Wednesday, July 31, 2013

WIP Wednesday - Slow sewing week

WIP Wednesday at Freshly Pieced

WIPs in a minute, first a finish: 

Rainbowtastic Tote
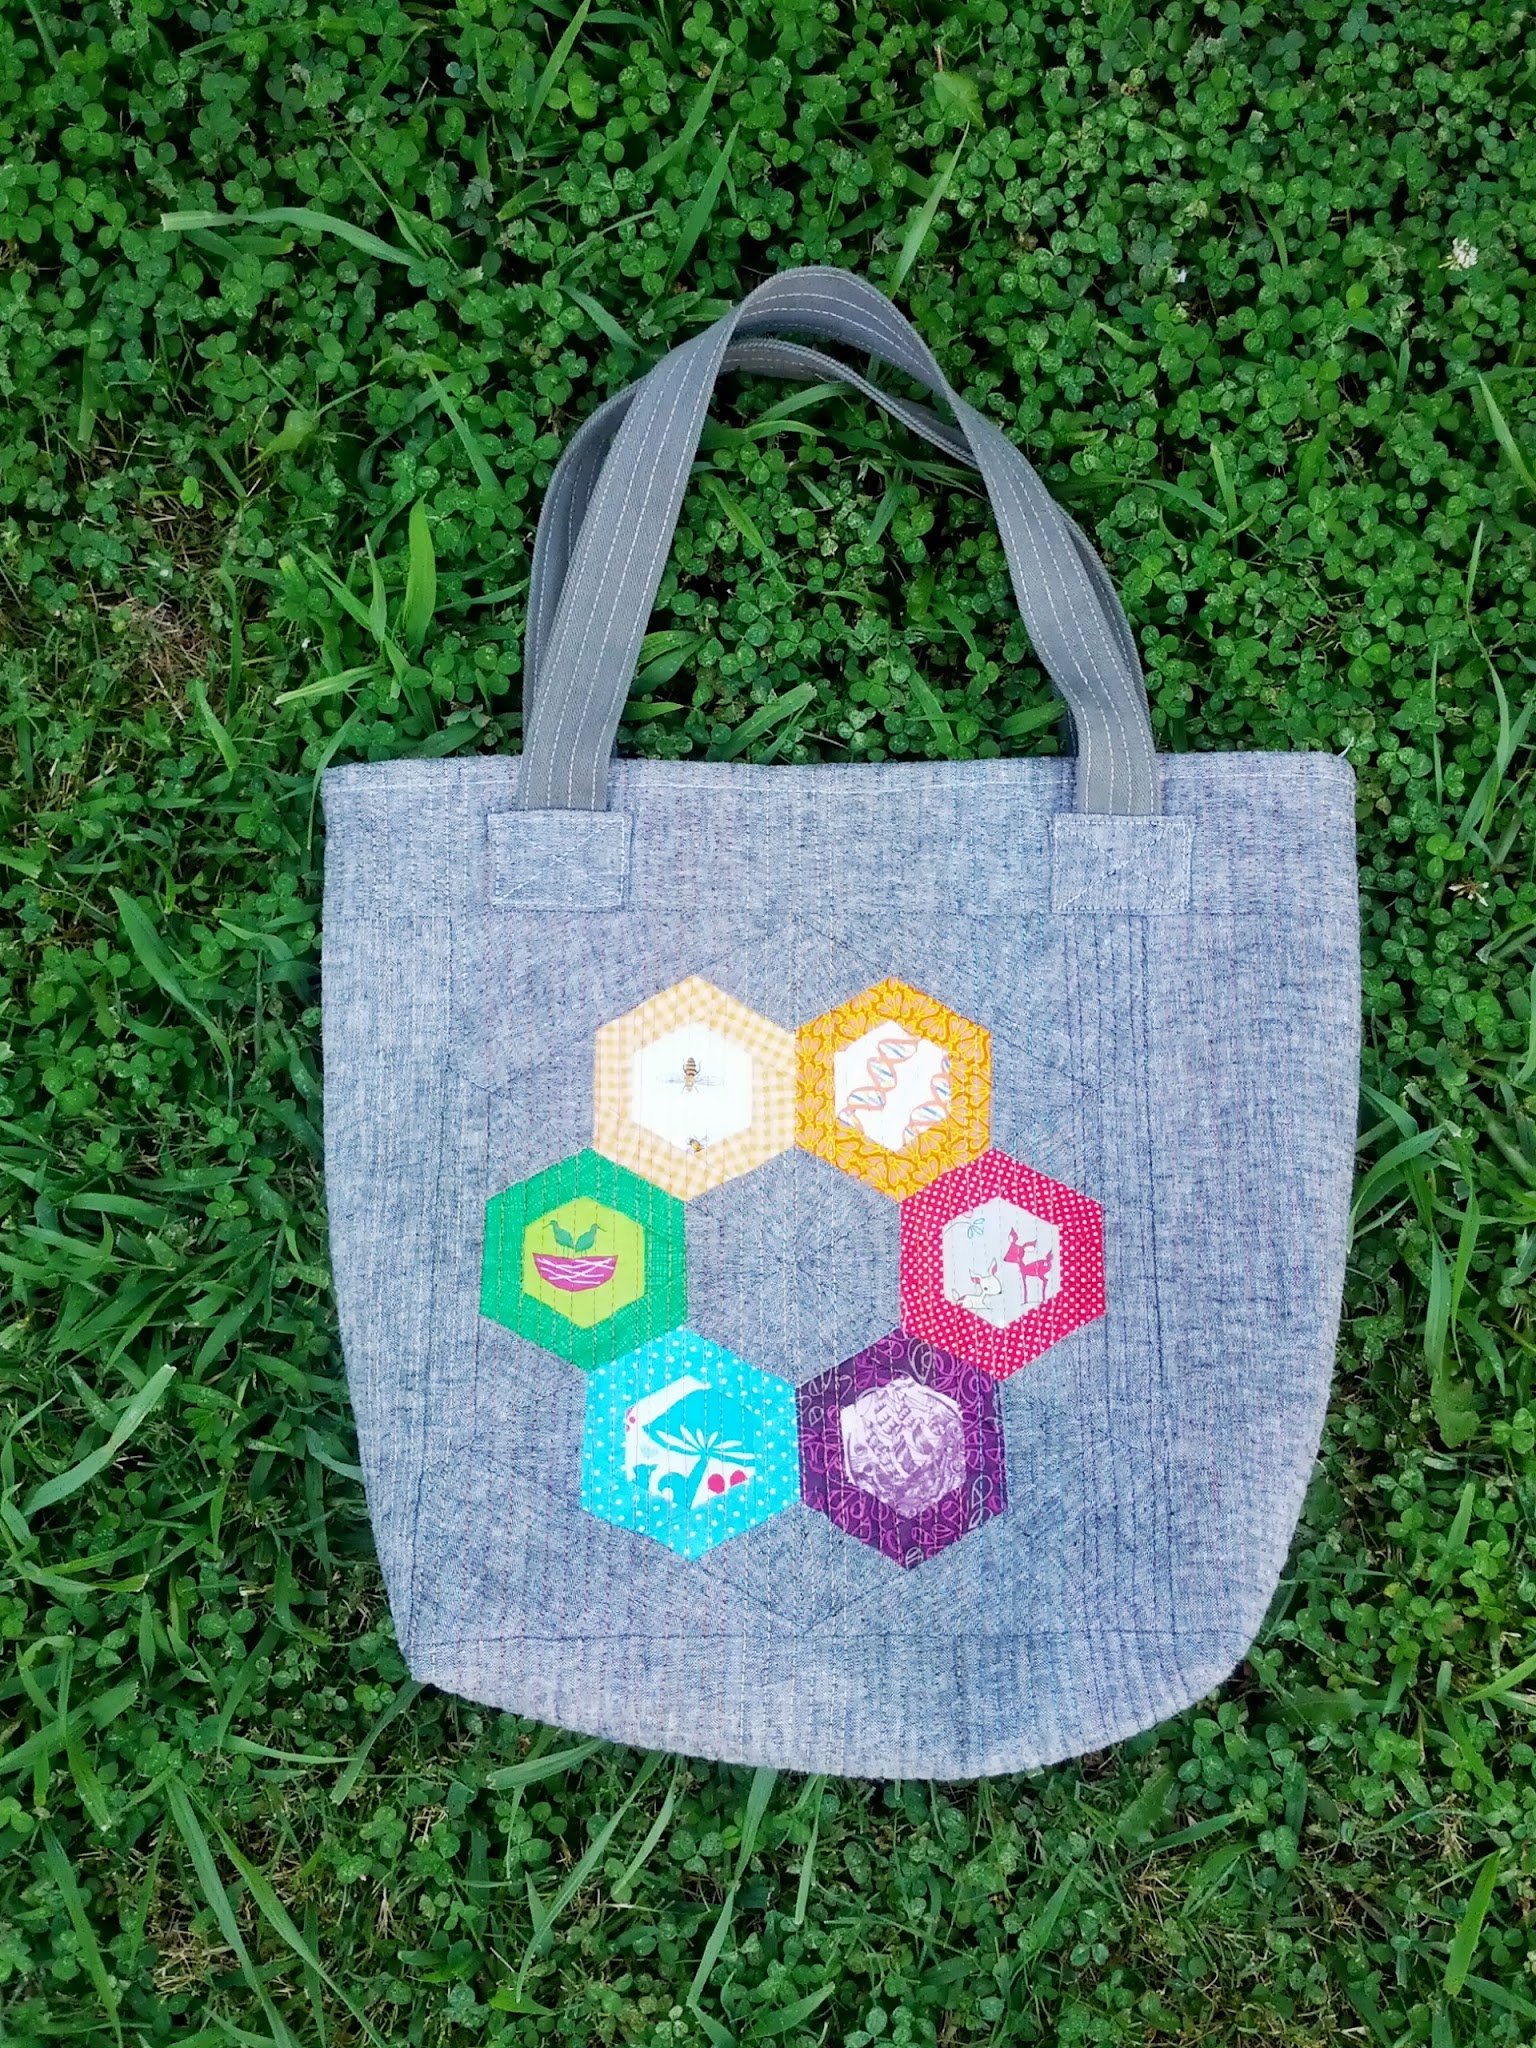
I spent most of my time last week finishing this tote. Check out the full blog post on it here. I stare at it adoringly all day at work and parade it around hoping someone will say "wow great tote" or "where did you get that!?" So far no one has said a thing - probably because they are rendered speechless at the sight of it.

I am still workin on testing the Sew Positive pattern for Elizabeth at Don't call me Betsy (pattern for sale soon).  I am making a lap-sized quilt and finished making the large plusses and most of the small ones. 


Oops I forgot to take a picture of all my plusses - but here are two of them next to some other WIPs at the Bham MQG meeting from Saturday. 

I also acted on a compulsion to tame my overflowing scraps and started cutting them into 2.5" sqares. I see a scrap vomit quilt (or 2) in my future.

The Bins. From L-R. Scraps big enough to make 2.5" squares. 2.5" strips. 2.5" squares.

Oh and sneak preview - here is a stack of oranges with a blue Kaffe Fasset shot cotton. This is a soon to be WIP.


Linkin' up with Lee and the gang at Freshly Pieced. I hope you have a lovely Wedneday. It looks like midnight outside at 8am - storms are a'brewin in the 'ham.

Sunday, July 28, 2013

Rainbow Tote {A Rainbow-Tastic Finish}

I finished my rainbow-tastic tote this weekend. I used the Garfunkel paper pieced block from the blockrockn series over at 627handworks and modified the market shopping bag pattern from Leanne at She Can Quilt.

The fabrics are a combination of saturated prints from my stash to make the hexagons and the back has some simply color Ikat diamonds prints. I paired it all with Essex yarn dyed linen in black. This is my first time working with the linen and I am a total convert now. It is easy to work with and adds such depth to the bag!

Just a little 8 x 8" block from some mini charm squares of simply color.


I couldn't decide on a thread color for quilting so I used them all! Here are a few close-ups of the 
quilting:


I quilted in straight lines with one color for 4-6 lines and then switched it out for the next color. I kept the bobbin the same white thread so I wouldn't have to change it constantly. The inside of the bag is one of my favorite prints from the birds and the bees:


I modified the finishing steps of the bag. Instead of making bias tape for the top, I folded the top over twice and top-stitched it down. For the handles, I used some heavy canvas and attached them to the outside of the bag. I basically made little pockets for the handle ends out of the linen and stitched it to the outside of the bag.


I love, love, love this bag. I was going to use it occasionally for looking fab at the library or farmers market, but it may have to accompany me on more mundane tasks as well. 


I'm linking up with Plum and June Let's get acquainted. If you found my blog through the link-up I would love to hear from you so I can check out your blog too!

Thursday, July 25, 2013

ALYoF July Finish - A tale of two mini quilts

A Lovely Year of Finishes
July is wrapping up and I am 7 for 7 in finishing my ALYoF goals. I set my July goal here to finish two mini quilts. When I finished, I realized these two minis couldn't be more different except that they each made the recipient very happy. tears shed = success!

I do Science Periodically 

Another coworker saw a periodic quilt I made and requested one of her own. I used a variety of solids to make up the table. Each element is 1" square. The background is a Kona brown. Maybe espresso?

Here is a close-up of the embroidery.

And a close-up of the amazing atomic dots fabric for the binding.

I used a dotty print for the backing.

I even had the chance to take some action shots in lab. Proving that I too, do science periodically.


Quote mini
A coworker and friend of mine recently lost her mother suddenly. I wanted to do something for her to show I was thinking about her so I slyly asked her to write down her favorite quotes.


I designed some paper pieced letters for the quote (thankfully it was a short quote!)

I kept the quilting simple - free motion flowers and leaves in the borders.

It's difficult to read in the bright light but the back is another one of her favorite quotes from Colossians 4:6


Thanks for stopping by! Check out the other finishes here. I'm also liking up with Crazy Mom Quilts and TGIFF. So happy it's almost the weekend.


Tuesday, July 23, 2013

WIP Wednesday - Colorful piecing and CAKE

WIP Wednesday at Freshly Pieced
Happy Wednesday. What have you been up to this week? It has been rainy, rainy, rainy here. It doesn't even feel like July. I have a colorful WIP edition this week:

1. Appliqueing circles to my heart's content.  I wrote a tutorial to quickly applique circles without raw edges. Check it out here.

2. Making a tote for me, because I want one. I saw Wombat Quilt's paper piecing Monday last week and just HAD to make the Garfunkel block...in rainbows....with fussy cut centers.


You can make your own - It is a free pattern available from 627handworks

The other side of the tote is going to have some simply color simple patchwork. A good way for me to use my mini 2.5" charm pack.


Not a WIP but I whipped up this cup holder in about 10 minutes just for funzies. I gave it to a friend for her birthday. 

 FACT: Cups look good set on rainbow Garfunkel blocks.

 Also not a WIP but it is CAKE! Chocolate Amaretto crepe cake from sprinkle bakes. This is 20 layers of crepe-y goodness. My lab loves me when I bring them cake.

What are you working on? Link up with Lee at Freshly Pieced.

Monday, July 22, 2013

No fuss circle applique {A tutoriolito}

Here is any easy way to applique circles without those pesky raw edges. I'm not snubbing the raw edge, but sometimes you just want it neat. It is perfect for circles of all sizes.

Supplies!
A circle of fabric*** 
A square of lightweight fusible interfacing the same size as the circle (single sided is fine)


1. I traced a cookie cutter onto fabric and cut out a circle. Then I cut out a square of interfacing just larger. You could cut out a circle of interfacing the same size as your fabric but that is just more work, no thanks!
***Ooh alternatively you don't need to cut a circle out either - just draw a circle on the wrong side of the fabric and sew along that line in step 3. I bet that would give you an even MORE perfect circle.

2. Align the fabric onto the interfacing right sides together. Ergo, right side of fabric with fusing side of interfacing.

3. Sew ALL the way around with a 1/4" seam - or you best attempt at one.

4. Cut away the interfacing and snip around the curves being careful not to snip through the seam. See this is why you don't need to cut a circle of the interfacing. 

5. Cut a line into the interfacing being careful not to cut the fabric. Turn your circle right side out and wrangle it into submission with your fingers, a pokey tool but do NOT iron:

SERIOUSLY DO NOT IRON. Remember the fusible interfacing is still on the back.

6. Arrange your circles in a pleasing way. The gods will let you know when you have achieved circle placement enlightenment.

7. Now you may iron. Press them onto the new fabrics according to the directions for your particular interfacing.

8. Sew 'em down using your preferred method. I chose a blanket stitch. The fabrics I used were some scraps from Kona Modern Quilts line by Robert Kaufman.

This tute is brought to you by the rain because this is what most of my weekend looked like:

I hope you have a happy week. As always if you try my tutorial I would love to hear about it. Hashtag it with #sewinghungry

Wednesday, July 17, 2013

WIP Wednesday - Positively Sewing

WIP Wednesday at Freshly Pieced

Happy Wednesday. The middle of the week just seems to slip up on me these days. Here is what I have been working on the past week:

Testing the Sew Positive pattern for Elizabeth at Don't call me Betsy. This pattern will be for sale soon. It is a fun mix of large and small plus blocks. I am going for a lap-sized quilt and made most of the large plusses 
 I went scrappy with the prints and the background, no surprise there.

The print on the right was my inspiration for the color palette. It is a Robert Kaufman mosaic print.

I made one of the small plusses blocks to test it out and have cut out most of the fabric for the rest of these. I'm already thinking about some fun ideas for the back and how I am going to quilt it. I can't wait to see where this goes.

I also made a small bit of progress on my mitosis cross-stitch. I fill in the background green when I am watching movies. No thought required, score!

What have you been working on? Check in with all the other WIPper's at Freshly Pieced.

Wednesday, July 10, 2013

Put your Finish-A-Long Q3 Goal Setting Party Pants On

she can quilt

Round three of the 2013 finish-a-long is sure to be a busy one.

1. Quilt for my bed. My bed does not have a homemade quilt on it. So I am using these lovely cotton couture solids to make one.


It will be a non-scrappy, non-paper pieced variation on my string-a-hex block. Looking something like this:


2. Diaper bag for a friend. I have the fabrics pulled and the pattern ready to go.


3. EPP quilt (HA!) This is quickly (slowly?) becoming my oldest WIP ever.


4. quote mini quilt.


5. periodic mini- This is the first one I made. I am making another for a coworker.


6-7. I have started two charity quilts from some novelty scraps leftover from other kids quilts. I am playing with rectangles and negative space on these. I'll get two quilts out of these - boy and girl.


8. Pattern testing a pattern. It's going to be patterntastic and testerific.