Wednesday, December 25, 2013

A season of giving

I am wishing you and yours a very Merry Christmas and Happy Holidays. This year at my house, the Holidays are going to be low key and hopefully stress free! My hubs and I traditionally go to see his family in El Salvador on alternating winters and this was supposed to be a year to go. But we have had a busy busy semester with him interviewing all over the country for residency positions. Next semester will be just as busy with his away rotation to Korea and my heavy teaching load. I am thankful we will get to spend a quiet day at home just enjoying each other's company and playing board games (once I leave the lab...yeast wait for no beast!)

I've been meaning to share two special quilts I made this year for charity. I try to make sure I make 1-2 charity quilts every year as one of the ways I give back. I wasn't sure where to send these quilts originally and I sat on them for a while. But then I remembered that Chick-fil-A sets up a Christmas tree sponsored by the salvation army in December for kids donations. You can  pick any number of kids and bring in a gift for them. I chose a 1 yr. old boy and 1yr. old girl to give these quilts:

Boy quilt - I used up the rest of my scoot transportation fabric to make this cute rectangle quilt. I love the backing fabric I chose here too. It's a perfect complement to the front.


For the quilting I decided to try something different and I free motion quilted different angular shapes with a variegated Aurifil thread.

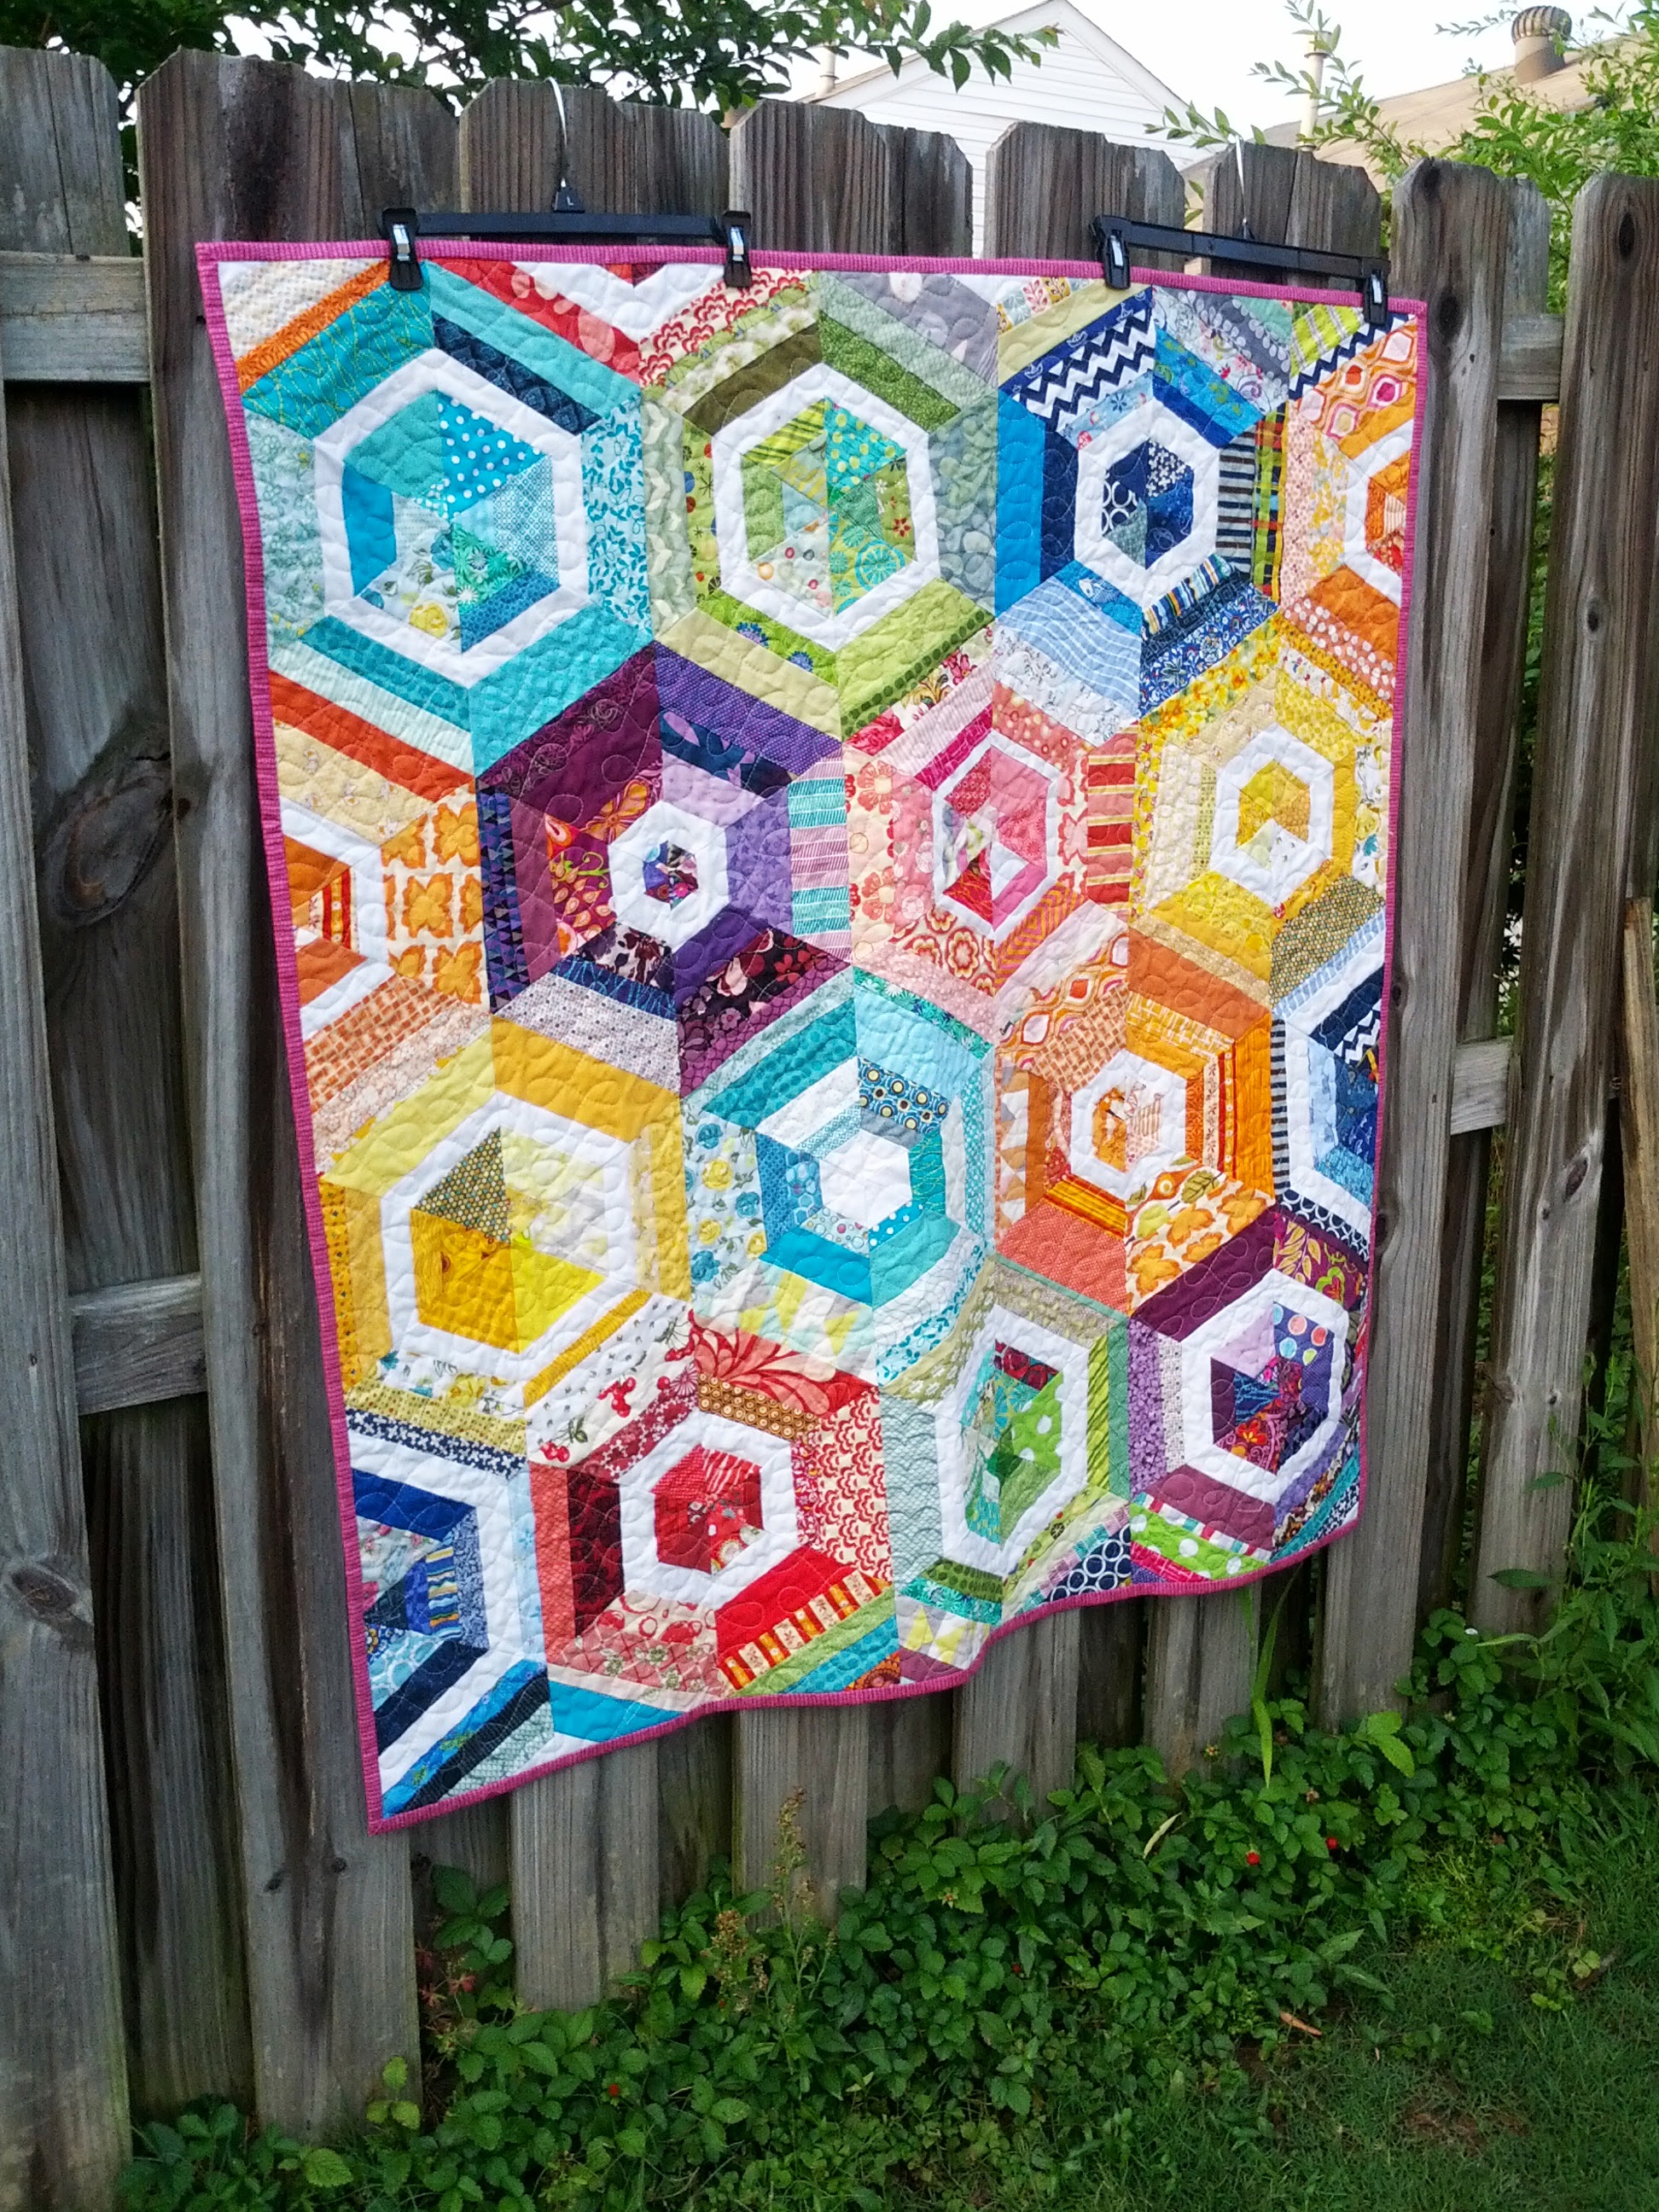
Here is the girl quilt:

This is my own pattern that I am calling fractal. It is actually made up of 16 identical blocks rotated to form this pattern. I quilted it with a giant spiral starting in the center which is why it looks a little puffy in the center in the picture below... or maybe that is because it was folded up for months before I decided to photograph it and I didn't iron it.

The back is made of wonky cross-cutting strips. Pretty psychedelic.


Merry Christmas little boy and little girl. I hope you like your presents!!


Monday, December 2, 2013

Skirting the Tree

We interrupt my (lately) silent blog to bring you a finish! What do you get when you pair cool Christmas fabrics with a giant swoon block? A glorious tree skirt.

I was drawn to a bright red with icy blue palette. The woodgrain grounds everything and the low volume background ensures that the overall effect is soft. My only regret is that I used too many grayish background fabrics. The gray was so close to the blues I used that you lose the overall swoon effect. It is so hard to get soft colors to contrast the right way!


I made a 2X swoon block and then cut out the center.

The bias binding went all around the quilt and then I added ties so it would close around the tree.

Emboldened after seeing Sarah's (Stitching and bacon) dogwood quilting up close, I went for it. If she can do it surely I can too. It was fun and pretty easy given I already had a grid for reference:
I think the dogwod quilting is Christmas-esque without being too in your face.

 Iwanted a reversible tree skirt so I did a fun design on the back using some leftover HSTs from the construction of the front. It is decidedly bolder and frankly, looks better under the tree...go figure.

The busy design also hides all those pesky pine needles better. Sorry my grass is so brown.

Here are some pics in situ. It was early morning and my front window faces the sun. So get ready to deal with the glare.


Saturday, November 9, 2013

Halloween Mini Quilt/Placemat {A Tutorial}

Want to make a super cute octagonal mat for Halloween Thanksgiving or Christmas? This tutorial will show you how to make a place mat to go under a bowl, perfect for decorating the table for any holiday or just because. I made a Halloween version to distract me from eating all the candy. It worked pretty well! Of course I meant to blog about it before Halloween but you know how it goes.


Just a disclaimer, I used some fun quilt maths to design this block but it turned out NOT to be a regular octagon. For those of you who have forgotten your geometry, a regular octagon is has 8 sides of equal lenght. The disclaimer is that I wouldn't recommend trying to make something out of multiples of this block. Instead use Elizabeth Hartman's tutorial for the octagonal orb quilt block. She must have gotten an A+ in geometry.

Octagonal Mini:
All seams are 1/4". Please read through all the directions before you start. This is a foundation paper piecing pattern and the skill level is somewhere around confident beginner/intermediate sewists.

Start with 4 pieces of 8" x 11" paper and cut it into an 8" square. Then cut along the diagonal like so,

 I cut through all of the pieces at once to save time. Just be mindful to line everything up and keep it lined up after you cut!

Then mark 4" in from the top left corner and cut across that line diagonally. 

You should end up with 8 pieces than can be rearranged like this. Tada you're done!
 This is a good time to label each piece A - H on the front and back of each piece with a pencil. Oh and make sure you label which side is the front. Trust me, you'll thank yourself later when they all start looking the same.


Now you will use the foundation piecing stitch and flip technique. There are lots of great tutorials about this method like Rachel's Ziggy Strings from Stitched in Color.

Take your first piece of paper right side up and lay a strip of fabric along the widest part also right side up. You can use a glue stick to keep it stuck to the paper if you so choose. Layer another strip on top right side down and sew a 1/4" seam. Use a smaller stitch length, I set my machine to 1.4, so that the paper will rip off easily later.

Here is what the back will look like:


Then press down the seam and follow the same procedure all the way down the paper until it looks like this:


Trim your block using the paper as a guide. Do the same for the other 7 pieces of paper.

Now rearrange the blocks and sew A to B, C to D etc. Then sew AB to CD and EF to GH. And finally sew ABCD to EFGH.

Then make a quilt sammich and quilt as desired. I chose to free motion quilt a spider web design. I really wish I had some glow in the dark or silver metallic thread at this point but instead I went with some good ole 40wt light gray Aurifil.

The quilting shows up nicely on the back:

Bind it. At this point I am too lazy to write a tutorial for how to bind weird angles but luckily Jaybirds quilts has one so knock yourself out. And voila there you go:

I cut all my strips different sizes and went for a wonky look, but you could use the same sized strips and make a less scrappy looking version. I am so happy with mine. In my opinion, the addition of the electric yellow really elevates the color scheme from traditional to Shriek Chic ©.

And look, I didn't even open the candy!!

Here is a shot in the "dark." I used a glow in the dark skeleton fabric for the binding and I was trying to get a good image of that but my camera phone is not exactly the right tool for that job. Either way, you'll have to trust me that it looked super cool on Halloween night!


If you make one of these mats for Thanksgiving, Christmas, Hanukkah, Festivus or for everyday use. I would love to see a picture of it! 

Saturday, October 26, 2013

Another quilted tote

In addition to the messenger bag bonanza. I made another quilted tote, this time to give to my cousin. She lives in Maine so we rarely get together but I saw her at a wedding a few weeks ago. Incidentally, for those of you keeping track, that means I took up one wedding quilt, 5 messenger bags and this tote in my carry on luggage. I barely had room for my clothes.

Anyway..My cousin is a kickass mom of 3 adorable kids and I knew a big tote would be just the thing for library trips and whatever else comes her way.

Once again I followed She Can Quilt's tutorial for the market shopping bag pattern using the same modifications as last time except I did use bias tape to finish the top as stated in the original pattern. I used Essex yarn dyed linen in flax and paired it with a mini charm pack of the odds and ends fabric line. The handles are canvas and I used a too muchery print for the lining. I failed to take a photo of the inside of the bag or the back so you'll have to trust me that they look flawless.

I did manage to capture a puppy photo shoot:


And best of all my cos loved it! I think she can fit at least 20 library books in there with a little help from her trio.

Friday, October 25, 2013

Blogger's Quilt Festival {String-A-Hex}

AmysCreativeSide

Deets
Quilt: String-A-Hex
Category: ROYGBIV
Pattern: My own foundation paper pieced design. You can find the tutorial on my blog.
Size: 47" x 51"
piecing: 50wt white aurifil and used up a bunch of random bobbins
Quilting: free motion figure eight quilting with 50wt white Aurifil on my home machine.

I originally designed this quilt for the Festival of Strings contest by Rachel at Stitched in Color. My design is a twist on foundation paper piecing hexagons into scrappy rainbow goodness:

String-A-Hex

The blocks are unified by a strip of Kona White. I varied the width and position of the white to add more interest. Here is a photo of the completed top floating in the breeze.
String-A-Hex

The quilting is an allover free motion figure 8 loop. It adds great texture but does not overwhelm the quilt or make it any busier!

The backing mirrors the pattern on the quilt top. I also added a strip of gray flannel along the side - make it work moment! The binding is Chicopee ladder dot in fuchsia. Love this print.

Thank you for visiting my BQF entry. If you are new to my blog I encourage you to browse around, maybe take a look at some of my tutorials or other finished quilts? Also make sure you take a look at the plethora of of quilts being shown at the festival

Thursday, October 24, 2013

Get the message?

I love the messenger bag pattern from Zakka Style. I must have used it close to 15 times by now. My mom commissioned 6 more when she visited a few weeks ago. I did a "rush order" on the Ostrich one so she could give it as a belated birthday gift and I made the rest to take home when I went to the wedding last weekend.

I had a lot of fun mixing and matching prints and colors for all the bags. I also enjoyed using different techniques to embellish the front flaps.


Bag #1 - Reds and browns. I used some Flea market fancy and Birds and the bees in this one. I love how versitile and sophisticated it looks. The main body of the bag is a gray duck canvas.


Bag #2 - Purples and oranges. I toned down the bright purple and orange with some green architectures in the inside flap. I used freezer paper applique on the front. The main body of the bag is a gray duck canvas.
 

Bag #3 - Purple paw print! This one has a raw edge appliqued paw print. The inside is loads of fun with bright colors and some fruits. You can't see it but the outside pockets are lined with snail fabric. I had a lot of fun mixing prints and colors in this one. The main body of the bag is Essex yarn dyed linen in denim.
 

Bag #4 - Purple Explosison. This one is for my mom. She went through my stash and pulled out ALL my purples. She requested that I use them all and I tried to restrain her but it didn't work. In the end I used a little bit of almost all my purples. I also added some decorative stitching on the front flap. The main body of the bag is Essex yarn dyed linen in black.
 

Bag #5 - Purple Diamond. This one just might be my favorite. I used some New Leaf and waterfront park. I love how the purples and orange really pop with the main fabric (Essex yarn dyed linen in black). 


Can you tell most of my mom's friends really love purple?? Thanks for being my best client, Mom! Linking up with Crazy Mom Quilts and TGIFF which is over at Quilter in the Closet today.