Wednesday, February 27, 2013

March - Lovely Year of Finishes

A Lovely Year of Finishes

Goal for March: Finish the all hands on deck quilt

This year is flying right by. I am two for two on completing my January and February goals. March is my most ambitious goal yet. So far I have...

Ze Fabrics. I am making a twin sized jungle paths quilt for a friend who is expecting her first baby very, very soon. This is a commissioned piece so she has been working with me along the way to pick out the pattern and fabrics. It has been a blast involving someone else in the design process. The pattern is designed by SewCraftyJess. I have used it before for the Simpatico Monsterz baby quilt. The center fabrics will be a combination of the All Hands on Deck blue/green colorway and fabrics collected from her friends and families. 

The "L" shaped blocks will be in various navy fabrics color weave (P&B textiles), medium chevron (Riley Blake), Ring toss in nayv (metro living) and the fleet (Seven Seas from Cloud 9 - glad I snagged this when I did because they are now out of print) The sashing is Kona ash.
Seriously adorable whales and sails.
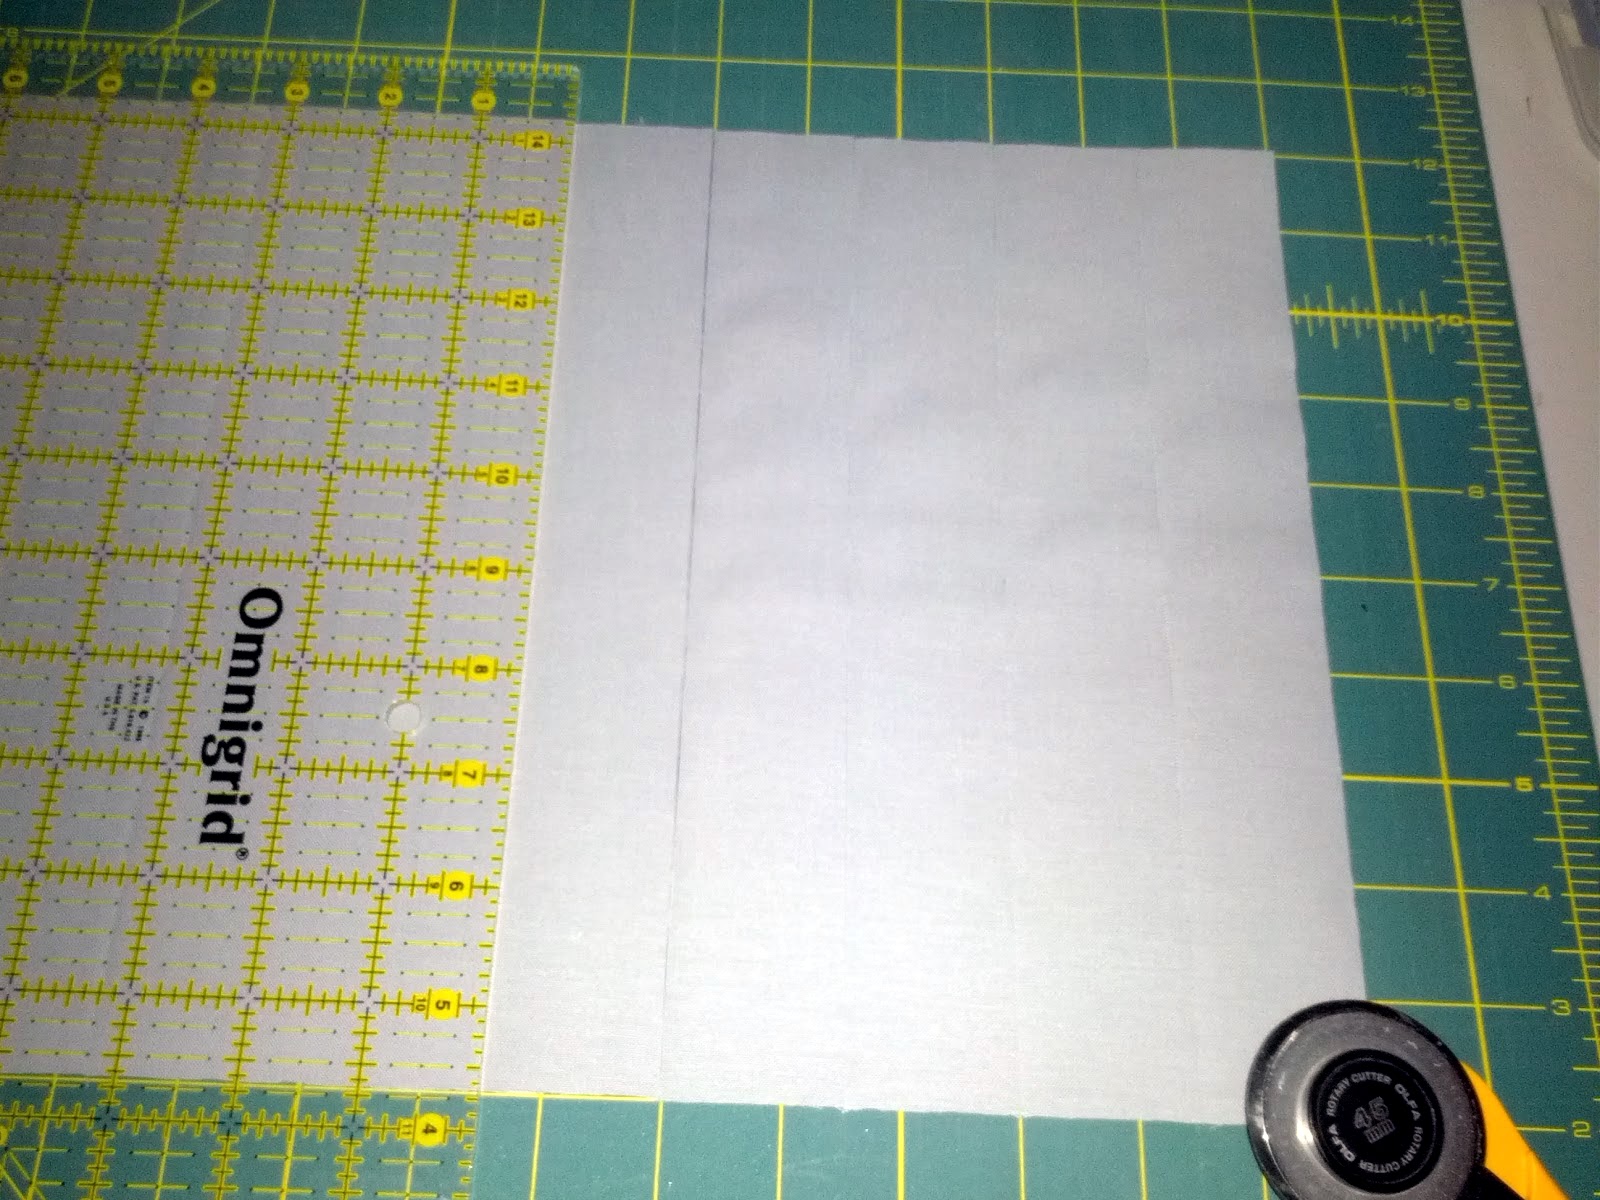
Cut the fabrics

Started the blocks

I am still in the midst of assembling the last two pieces for the L-block assembly style. But I couldn't resist finishing just one block...


Left to do: Piece the blocks, assemble the top, assemble the back, quilt and bind. Let's get crackin.'

Linking up with freshly pieced on this wonderful WIP Wednesday and with LYoF March goal setting.

Saturday, February 23, 2013

Friday, February 22, 2013

Handmade Baby Shower

One of our crafting circle (It would be a knitting circle but I refuse to knit) is expecting her first baby any day now. She is also the first of the group to pop out a kiddo. We were all very excited to have an excuse to make baby things for her.

 Two of us made these puffy letters for baby Walt (sorry the W got lost). We used some gear fabric and circuitry along with other blues and grays. Walt also got some kickass bibs and blankets.

 We each got these lovely thank you bracelets! With a sweet message on the back...

Yes, Yes I am.

Happy FRIIIIIIIIIDAY!

Wednesday, February 20, 2013

WIP Wednesday - too busy not sewing

WIP Wednesday at Freshly Pieced

My New Year's resolution was to link up with WIP every week. So here I am. I am super busy right now - not much sewing is going on. Even if it does, no pics are to be found. But...I started a new twin sized quilt. My first commissioned piece.  Here are the fabrics:

I'll try for something more satisfying next week.

Saturday, February 16, 2013

Cutting tips

I love efficiency at work and at home. When I start a new quilt from a pattern I cut everything, and then chain piece as much as possible to get everything done. It is more monotonous than making one block at a time but I find peace in the monotony. I mean, I still enjoy moving small amounts of liquid from one tube to another 100 times a day at work.

I like to use my time wisely while still being accurate in cutting and piecing. I though I would share with you my technique for how I cut lots of little strips of fabric very quickly using a rotary cutter and cutting mat. Since I am self taught and relatively new to this game, this may be old hat. Still, I hope some of you will find it useful and maybe in the comments you will give some tips on how to do this even better.

For my next quilt I needed to cut the following strips:
126      4 x 1.5"
126      6 x 1.5"
63       5 x 1.5"
54      10 x 1.5"

I started by pressing my fabric in half (selvedge to selvedge) then in half again matching up the first fold with the edges. My calculator handy, I determined that I can get 30 1.5" pieces per width of fabric (WOF). I calculated that I would need 2 x WOF for the 10", 2 x WOF for 5" (plus a little extra - more on that later), and 5 x WOF for the 4" and 6". Sorry there is no picture to accompany this step.

I unfolded each strip once so that the fabric is folded in half  and lined it up on my large cutting mat making sure to line up the top of the fabric with the ruler guidelines on the mat and keeping the selvedge on my right. Then I centered another piece of folded fabric on top so that there are four layers of fabric on the mat. The images here are of my 10" X WOF pieces.

Then I cut off the selvedge squaring up the right hand size with the top and bottom. Then I measured 1.5" to the left and cut. Continue this way down the entire length of the piece.

By working from right to left you won't have to move the cut fabrics aside as you continue down the strip. I am right handed so lefties may want to completely reverse the process.

I separated the pieces a little bit so you can see where the cut lines are. 15 cuts x 4 layers of fabric is 60 pieces!  When I cut the smaller pieces I lined up the fabric on the cutting board as before but in two rows separated by an inch (again sorry no pics!) so that I could cut 8 pieces at a time!

For those of you doing the math at home you may realize that 2 X WOF won't be enough for 63 pieces of the 5 x 1.5" size, but you will have extra fabric leftover from both the 10" and the 6" so you can cut your extra pieces from those.

A little bit of planning, math and organization and you will have a tidy pile of accurately cut fabric. I hope you found this helpful. I would love to hear how you organize your cutting in the comments.


Wednesday, February 13, 2013

WIP Wednesday - not much going on

WIP Wednesday at Freshly Pieced

This last week I sewed with some new quilty friends at the Birmingham Modern Quilt Guild's first meeting ever on Sunday. Birmingham as in Alabama, not England. We got together from 1-4 and sewed, cut, and gabbed out little hearts out during a huge thunderstorm. Good thing the power stayed on I didn't bring any handiwork projects.

I don't have much to show for my hours of sewing that day. I am in the block construction stage for piecing a quilt for my sister. At least it is out of the project bag since I cut all the fabric in December.
Apiary quilt pattern by Kate Spain. I even found some cute bee fabric that I will incorporate into the back of the quilt. Hopefully that won't be too literal for my artsy sister.

I also made some progress with my EEP stars during Downton Abby. 
I got a lot further owing to the awesomeness of a 2 hour episode. Longer episodes means the end is drawing near for this season. I think the finale is next week. Sadness.

I have't touched my sewing since Sunday which is weird for me. Maybe it has something to do with the fact that I have been arriving at work at 5:45 am all week. Anyway, enough of my blubbering. Any of you going to the stash bash in Atlanta in April? I am! If you are, I can't wait to meet you. If you aren't, I think there are still a few spots left.

The Stash Bash

Monday, February 11, 2013

Tongue in cheek

Disclaimer: This post is in no way making fun of those who take Valentine's day/holiday crafting seriously. But I just couldn't help myself.

Happy VOLEentine's day!
Volentine's day pillow
 I squarified Tula's LOVE pattern and rearranged the letters. Assorted low volume grays from a swap make up the background. Then my hubs (who is way more talented when it comes to drawing) drew me a vole on paper which I used as a template to cut the brown fabric. I appliqued the vole and then "drew" his features in with some free motion quilt lines.

Vole!
 And voila a vole. Oh you don't know what a vole looks like? Crazy city folk. Here you go...

Pretty close likeness, don't you agree?

Volentine pillow back
I backed the pillow in some of my favorite prints. Center city (Jay McCarroll) and Parisville for another nod to Tula. Hopefully she won't mind me bastardizing her pattern this way. This is also the first time I used a zipper to finish the pillow. I followed Amy's tutorial for a covered zipper.

Fresh Poppy Design
Linking up with Fabric Tuesdays.

Saturday, February 9, 2013

Star Gazing: A finished baby quilt

A Lovely Year of Finishes

February goal finished way ahead of schedule! See my progress here and here.


Star Gazing

Star Gazing stats:
30" square with rounded edges
Fabrics include Matsuri lawn cotton, Washi and another low volume print of unknown origin
Machine pieced, quilted and bound with Aurifil 50wt white thread.
Going to some friends who are expecting a little girl next month.

I noticed from the expecting mom's pinterest that she was drawn to soft pastel colors and grays for the nursery. I chose to use some heavy weight fabrics for the back so that it would be a durable play mat/ stroller quilt. They still washed up nice and soft.
Star Gazing
It is difficult to see in the bright morning light but the center fabric is flanked by a purple print and then a white with purple print. To bring back the puple color at the edges I chose a light purple print for the binding. 

There is no purple on the front of the quilt but it still plays well together with the prints on both sides.

Star Gazing

Oh and here is my piecing mistake. It is very subtle. Do you see it now?
The lower left block should be rotated 90 degrees. I don't think anyone else will notice. It will be our little secret.  

The clamshell quilting (tutorial by Don't call me Betsy) gives this blanket a bubble wrap feel which I love.
Star Gazing

Now I have more than two weeks to figure out what my March goal should be...

Thursday, February 7, 2013

16 Patch block tutorial.

Easy peasy 16 patch quilt block. This one finishes at 8" square and is easily cut from fat quarters. All seams are 1/4". Enjoy the terrible night-time photos!

Before you begin make sure your machine is set to sew a scant 1/4" seam. Here is a good tutorial on how to check.

Start by cutting two strips of fabric 2.5 x 22 inches. You may want to starch the fabrics so they don't shift when you sew them together.

Sew the two strips together with 1/4" seam. I pinned the two fabrics together with about 4 pins to make sure they didn't shift.

Press your fabric towards the darker fabric

 Cut into 2.5" strips.

You should get 8 strips

And have a little leftover piece. Cute little nubbin.

Now arrange your pieces like so...

Sew together your squares. Make sure the centers line up. You can pin at this junction.

 Sew together and press the seam.

Sew together the halves

And press...

Sew the final seam. I pinned at each spot where the squares meet.
ta da! ta done!

Wednesday, February 6, 2013

WIP Wednesday - star gazing

WIP Wednesday at Freshly Pieced

This weekend I made a lot of progress on my February LYoF. The block tutorial is from Sew WE Quilt.She calls it an air castle block. It is based on the double HST and finishes at 10" square.

I think I will call it Star Gazing
Can you see my mistake in the quilt top?

I quilted it using Elizabeth's (Don't call her Betsy, who knows what happens if you do?) clamshell loop tutorial. It just felt right with the gray washi print.
 Hmm. Maybe the quilting will show up better after washing?

And a sneak peak of another project I have been working on. To appreciate the full effect of this project you will have to wait until I am done to see the rest.

Linking up with Lee at Freshly Pieced. And as Garrison Keillor says "Be well, do good work, and keep in touch"